Hosting
Tutorial: Deploy an Application Using Docker Compose
Hosting TEI Publisher - or a custom edition generated by it - does involve administration steps not everyone is able to perform. This usually includes installing Java, eXist-db and securing your installation with a proxy, as well as retrieving a certificate for SSL and registering a host name.
Using a docker compose workflow can be a cheap and viable alternative, at least for smaller editions without much traffic to expect. Our docker compose configuration comes with everything preconfigured and you don’t need to install any dependencies by hand. It also simplifies occasional updates and general maintenance. On the downside, it will likely not perform or scale as good as a dedicated server. In particular, rendering longer chunks of TEI (as we do for the TEI Guidelines app used as example below) will be considerably slower. But for smaller edition projects this may not be a problem.
The docker compose configuration is documented in detail in the README of the git repository. However, this might be a bit too dense for inexperienced users, so we’ll provide a step by step instruction based on an actual example in the following sections.
Example Application
As an example we’ll use the TEI Guidelines app. This is a rather simple application generated from TEI Publisher 7, which provides an easy-to-browse version of the current TEI P5 Guidelines.
While the docker compose workflow was primarily created with TEI Publisher 8 in mind (not released yet at the time of writing), it will work also with applications generated from Publisher 6 or 7.
1. Choosing a Provider
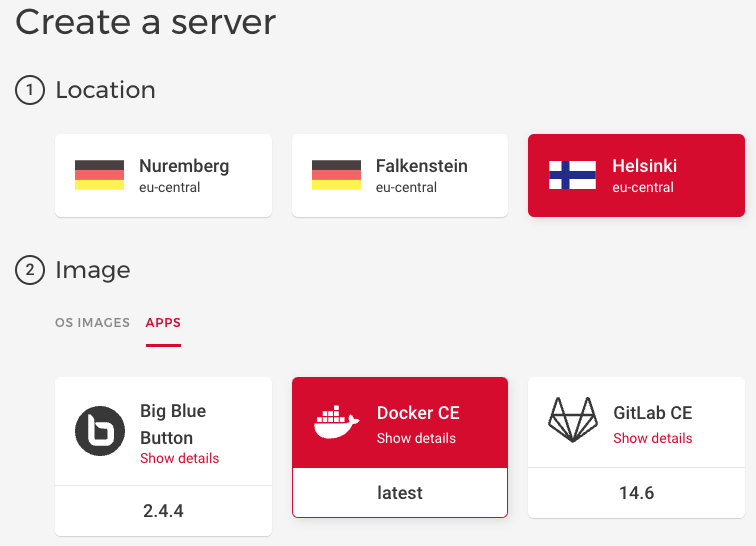
First we have to find a provider, ideally offering a cloud-based virtual machine with docker preinstalled. There are many options and you have to do some research yourself. For this walk-through, we’ll choose a Hetzner cloud server with 4gb of RAM, 2 virtual CPUs and 40gb SSD space.
When configuring the server, we select the Docker CE image instead of an OS image. This comes with docker preinstalled. The web interface then suggests a matching server configuration, but we’ll choose a slightly less powerful one. You may also want to upload an ssh key (for easier access later).
2. Configuring DNS
Once the server has been created, you want to map it to a domain you own. How this is done exactly depends on who is managing your domain. It might be the university - in which case you have to contact them - or you bought your own domain somewhere, where you can manage it. Also, different server providers may have different suggestions about how to establish the DNS mapping in the correct way. Therefore check for instructions by your provider.
For our example, it will be enough to add a “type A” DNS entry mapping demo.teipublisher.com to the IP of the just created server. You can use the dig command locally or on your server to see if the DNS mapping worked (it may take a while). In our case the output shows the following, which is correct for our demo:
;; ANSWER SECTION:
demo.teipublisher.com.	86400	IN	A	65.21.105.16
3. Create a Dockerfile for your app
In order to run our target application - the TEI P5 guidelines - within docker, we need to have a Dockerfile. The easiest approach is to copy the template provided in the teipublisher-docker-compose repository into the root of your application (name it Dockerfile) and then modify it:
- Change
MY_EDITION_VERSIONto the name of your application repository and point it to the branch you want to build:ARG TEI_GUIDELINES_VERSION=master - Edit the
git clonecommand to build from your git repo:# Replace git URL below to point to your git repository RUN git clone https://github.com/eeditiones/tei-guidelines.git \ && cd tei-guidelines \ && echo Checking out ${TEI_GUIDELINES_VERSION} \ && git checkout ${TEI_GUIDELINES_VERSION} \ && ant - Modify the COPY instruction below:
COPY --from=tei /tmp/tei-guidelines/build/*.xar /exist/autodeploy/
Test your docker build with e.g.:
docker build --pull --rm -f Dockerfile -t teiguidelines:latest .
and run it locally to see if everything is ok:
docker run -p 8081:8080 --name teiguidelines teiguidelines:latest
If everything works, push the Dockerfile to your repository. For reference, the Dockerfile create for the TEI Guidelines using above steps is available on github.
Note for TEI Publisher 6 and 7
If you created your app from TEI Publisher 6 or 7, you should also change definition of variable $config:context-path in modules/config.xqm. The old definition looked as follows:
declare variable $config:context-path :=
   request:get-context-path() || substring-after($config:app-root, "/db")
    (: "" :)
;
Change this to
declare variable $config:context-path :=
    let $prop := util:system-property("teipublisher.context-path")
    return
        if (empty($prop) or $prop = "auto") then
            request:get-context-path() || substring-after($config:app-root, "/db")
        else
            $prop
;
This small change will allow us to modify the context path of the application via an environment variable.
4. Fork the docker compose repository
On github, create a fork of the teipublisher-docker-compose repository into your own or your organizations github account. You may also rename it, e.g. to guidelines-docker-compose.
Clone the forked repository to your local disk, so we can start modifying it: open the docker-compose.yml and change services.publisher.build.context to point to your app repository:
build:
    context: https://github.com/eeditiones/tei-guidelines.git#master
    dockerfile: Dockerfile
4.1 Access Dockerfile from private Git repository
The following was only tested for Gitlab but should work the same for any private Git repository that provides access tokens.
In case tei-guidelines.git is hosted on a private Gitlab repository following steps are need to ensure Docker can acess it.
- create a
Personal Access Tokenfor your Gitlab user and note it down (sample user here isdemo-user - adjust the
contextindocker-compose.yml:context: https://demo-user:${GITLAB_TOKEN:-unset}@github.com/eeditiones/tei-guidelines.git#master(do not(!) replace${GITLAB_TOKEN:..}but only the Gitlab username - whenever you call
docker composelater, make sure to prependGITLAB_USER=guideline-user GITLAB_TOKEN=<Your-Secrect-Token> docker compose(replace `' with your personal access token password).
Unless you are using TEI Publisher 8 (not released yet at time of writing) or a development build, you can also delete the entire ner: section from docker-compose.yml. The ner (named entity recognition) service is only used within the annotations editor, so you can also remove this if you do not plan to annotate documents.
And in conf/default.conf change the two occurrences of /apps/tei-publisher into /apps/guidelines or whatever your edition application is called when installed in eXist:
location / {
    proxy_pass http://docker-publisher/exist/apps/guidelines$request_uri;
    proxy_redirect http://$host/exist/apps/guidelines/ /;
    ...
}
Build the configuration once to make sure it works:
docker compose build --build-arg ADMIN_PASS=my_pass
Depending on the version of docker compose installed on your system, the command to use may either be docker compose (as shown above) or docker-compose. Both work the same. So for the following sections, if we write docker compose, you may have to replace it with docker-compose on your machine (or server).
Afterwards you can launch the docker compose config locally to check if everything went fine:
docker compose up
You should be able to access your application via http://localhost.
Next, we want to prepare the configuration for our newly created server. For this we have to provide an nginx configuration file matching the name we chose for our server (when configuring DNS above). Rename example.com.tmpl accordingly and add a .conf suffix, i.e. for our demo: demo.teipublisher.com.conf. Open the file and edit it as follows (make sure to also apply the edits to the commented out section at the bottom):
- choose a unique name for the upstream server:
upstream docker-guidelines-publisher { server publisher:8080 fail_timeout=0; } - replace the other two occurrences of
docker-publisherwith this name - change the
server_nameto the name of your server:server_name demo.teipublisher.com; - replace the other occurrences of
example.comwith your new server name - also again change
/apps/tei-publisherinto/apps/guidelinesor whatever your edition application is called when installed in eXist.
For reference, our final config looks as below. The large commented out section at the end will be enabled later.
# Configuration for TEI Publisher with virtual host and SSL

# change name of upstream server below to something unique
upstream docker-guidelines-publisher {
  server publisher:8080 fail_timeout=0;
}

server {
  listen 80;
  listen [::]:80;

  server_name demo.teipublisher.com;
  server_tokens off;

  # Required by letsencrypt certbot to acquire certificate
  location /.well-known/acme-challenge/ {
      root /var/www/certbot;
  }

  location / {
    return 301 https://demo.teipublisher.com$request_uri;
  }
}

# Comment in the following section after acquiring an SSL certificate and make the required changes as
# indicated below

# server {
#   listen 443 ssl;
#   listen [::]:443 ssl;

#   server_name demo.teipublisher.com;

#   ssl_certificate /etc/nginx/ssl/live/demo.teipublisher.com/fullchain.pem;
#   ssl_certificate_key /etc/nginx/ssl/live/demo.teipublisher.com/privkey.pem;

#   location / {
#     # change upstream server placeholder 'docker-publisher' below to what you configured above for upstream
#     proxy_pass http://docker-guidelines-publisher/exist/apps/guidelines$request_uri;
#     proxy_redirect http://$host/exist/apps/guidelines/ /;
#     proxy_set_header   Host $host;
#     proxy_set_header   X-Real-IP $remote_addr;
#     proxy_set_header   X-Forwarded-For $proxy_add_x_forwarded_for;
#     proxy_set_header   X-Forwarded-Host $server_name;
#     proxy_ssl_server_name on;
#     proxy_cookie_path /exist /;
#     client_max_body_size  512m;
#   }

#   location /apps/eXide {
#     # change upstream server placeholder 'docker-publisher' below to what you configured above for upstream
#     proxy_pass http://docker-guidelines-publisher/exist$request_uri;
#     proxy_redirect     off;
#     proxy_set_header   Host $host;
#     proxy_set_header   X-Real-IP $remote_addr;
#     proxy_set_header   X-Forwarded-For $proxy_add_x_forwarded_for;
#     proxy_set_header   X-Forwarded-Host $server_name;
#     proxy_ssl_server_name on;
#     proxy_cookie_path /exist /;
#     client_max_body_size  512m;
#   }
# }
Commit and push the changes to your fork of teipublisher-docker-compose. You can also compare your changes with mine by checking this commit.
5. Set up the Server
Use SSH to connect to the server you created in step 1. Exact instructions on how to SSH into your server should be available from your provider. On the server make sure you have a git client installed. If yes, clone your docker compose configuration repository:
git clone https://github.com/wolfgangmm/guidelines-docker-compose.git
Check if you can run either the docker compose version or docker-compose version command. They are not available everywhere, even if docker is installed. If none of the two can be found, follow the instructions in the docker docs on how to install them. We suggest docker compose v2, though v1 will also work. They just differ in the commands used (docker-compose for v1).
Change into the directory and build it:
docker compose build --build-arg ADMIN_PASS=my_pass
where my_pass should specify the password for the eXist admin user.
Run the configuration once in order to obtain SSL certificates:
docker compose up -d
Start the registration with the following command, making sure that you use the full name of your host in the -d parameter:
docker compose run --rm certbot certonly --webroot --webroot-path /var/www/certbot/ -d demo.teipublisher.com
The output should be as follows:
root@teipublisher-test:~/guidelines-docker-compose# docker compose run --rm  certbot certonly --webroot --webroot-path /var/www/certbot/ -d demo.teipublisher.com

Saving debug log to /var/log/letsencrypt/letsencrypt.log
Enter email address (used for urgent renewal and security notices)
 (Enter 'c' to cancel): wolfgang@jinntec.de

- - - - - - - - - - - - - - - - - - - - - - - - - - - - - - - - - - - - - - - -
Please read the Terms of Service at
https://letsencrypt.org/documents/LE-SA-v1.2-November-15-2017.pdf. You must
agree in order to register with the ACME server. Do you agree?
- - - - - - - - - - - - - - - - - - - - - - - - - - - - - - - - - - - - - - - -
(Y)es/(N)o: y

- - - - - - - - - - - - - - - - - - - - - - - - - - - - - - - - - - - - - - - -
Would you be willing, once your first certificate is successfully issued, to
share your email address with the Electronic Frontier Foundation, a founding
partner of the Let's Encrypt project and the non-profit organization that
develops Certbot? We'd like to send you email about our work encrypting the web,
EFF news, campaigns, and ways to support digital freedom.
- - - - - - - - - - - - - - - - - - - - - - - - - - - - - - - - - - - - - - - -
(Y)es/(N)o: n
Account registered.
Requesting a certificate for demo.teipublisher.com

Successfully received certificate.
Certificate is saved at: /etc/letsencrypt/live/demo.teipublisher.com/fullchain.pem
Key is saved at:         /etc/letsencrypt/live/demo.teipublisher.com/privkey.pem
This certificate expires on 2022-06-11.
These files will be updated when the certificate renews.

NEXT STEPS:
- The certificate will need to be renewed before it expires. Certbot can automatically renew the certificate in the background, but you may need to take steps to enable that functionality. See https://certbot.org/renewal-setup for instructions.

- - - - - - - - - - - - - - - - - - - - - - - - - - - - - - - - - - - - - - - -
If you like Certbot, please consider supporting our work by:
 * Donating to ISRG / Let's Encrypt:   https://letsencrypt.org/donate
 * Donating to EFF:                    https://eff.org/donate-le
- - - - - - - - - - - - - - - - - - - - - - - - - - - - - - - - - - - - - - - -
Afterwards, edit your nginx configuration (conf/demo.teipublisher.com.conf) and remove the # comment sign from each line of the second server section.
Restart the docker compose configuration to apply the changes:
docker compose restart
You should now be able to access your server by its new name using https instead of http, e.g. https://demo.teipublisher.com.
For reference, you can also check my final commit with the changes made in this section.
6. Final Steps
Restart Services after Server reboot
Edit docker-compose.yml to make sure your service is automatically restarted if the server reboots. To do this, remove the comment around restart: always.
Automated SSL Certificate Renewal
- Edit
certbot-renew.sh: adjust the value forCERTFILEand replaceexample.comwith the DNS name of your server. Here:CERTFILE=./certbot/conf/live/guidelines.tei-publisher.com/cert.pem - execute
certbot-renew.shto check if it works fine (should say:Certificate still valid) - Create cron job: run
crontab -eand then add the following line59 18 * * * /path/to/docker-compose/certbot-renew.sh. Check afterwards withcrontab -lif the line was really added. - reboot your server. You can check with
docker compose lsif your docker containers are running fine afterwards and you should be able to access your app via the new created DNS name of your server.